Integrate MinIO with IDrive® e2
MinIO is a self-hosted, high-performance object storage platform that provides an Amazon S3-compatible API for storing unstructured data across on-premises, private cloud, hybrid, and edge environments. Integrating MinIO with IDrive® e2 provides a capable, scalable cloud object storage solution that effortlessly extends MinIO for secure, efficient offsite backup and data synchronization. Use MinIO Client (mc) to connect MinIO with IDrive® e2 and copy or synchronize objects between the storage environments.
Prerequisites:
Before copying objects from MinIO to IDrive® e2, ensure the following:
- An active IDrive® e2 account. Sign up here if you do not have one.
- A bucket in IDrive® e2. Learn how to create a bucket.
- Valid Access Key ID and Secret Access Key. Learn how to create an access key.
- An on-premises MinIO deployment with a source bucket and credentials that can read its objects. If you are setting up MinIO for the first time, see the MinIO installation guide.
- The MinIO Client (mc) installed on a computer that can reach both MinIO and IDrive® e2.
Copy MinIO Objects to IDrive® e2
The following steps can help you successfully copy MinIO objects to IDrive® e2.
- Sign in to IDrive® e2. On the Dashboard, copy the storage endpoint, access key and secret for the region where your destination bucket is located.
- Configure MinIO and IDrive® e2.
Note: These PowerShell commands assume $mc contains the path to mc.exe. The MinIO endpoint http://127.0.0.1:9000 applies when MinIO runs on the same computer. If MinIO runs elsewhere, replace it with your MinIO server’s endpoint.& $mc alias set minio "http://127.0.0.1:9000" "MINIO_ACCESS_KEY" "MINIO_SECRET_KEY"
& $mc alias set e2 "https://YOUR_E2_STORAGE_ENDPOINT" "E2_ACCESS_KEY" "E2_SECRET_KEY"
- Confirm that both buckets are accessible.
& $mc ls minio

                     & $mc ls e2
The commands should list the buckets available through each storage endpoint. - Copy the objects from MinIO to IDrive® e2
& $mc mirror "minio/source-bucket" "e2/destination-bucket"
- Replace source bucket with the name of your MinIO source bucket and the destination bucket with the name of your IDrive® e2 destination bucket.
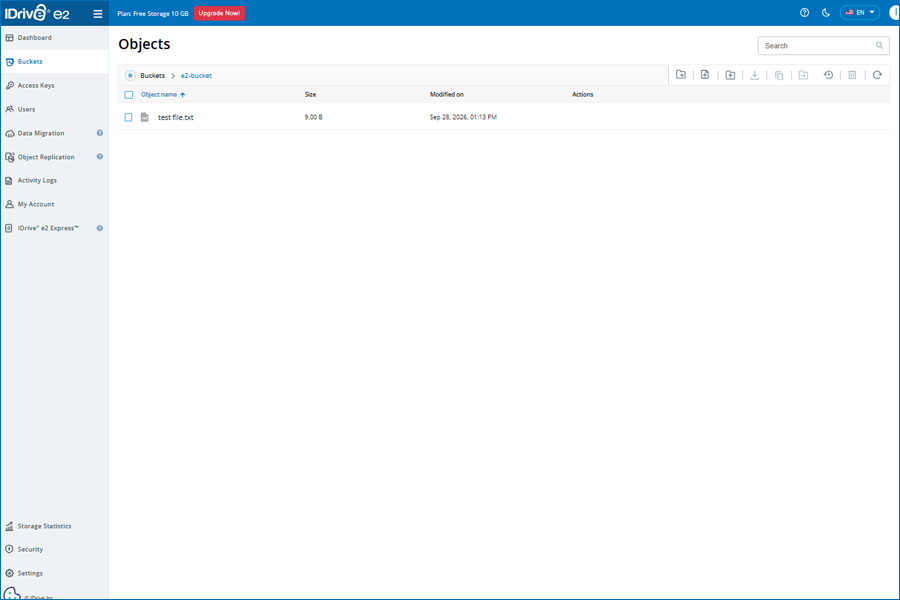
- Verify the copied objects. After the copy completes, list the objects in the
IDrive® e2 destination bucket.
& $mc ls --recursive "e2/destination-bucket"
Verify that the expected objects and directory structure are present.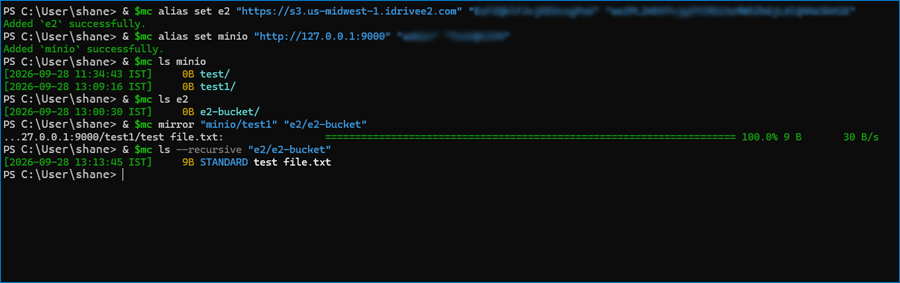
- Back up or sync later changes. For periodic backups, rerun the copy with
--overwrite to include changed objects. Objects deleted from MinIO remain in
IDrive® e2.
& $mc mirror --overwrite "minio/source-bucket" "e2/destination-bucket"
Use IDrive® e2 as an offsite destination for objects stored in your on-premises MinIO buckets. Configure the MinIO Client (mc) to connect to both storage endpoints and copy objects to an IDrive® e2 bucket. You can run the copy periodically for backup or use continuous synchronization when required.
Prerequisites:
Before copying objects from MinIO to IDrive® e2, ensure the following:
- An active IDrive® e2 account. Sign up here if you do not have one.
- A bucket in IDrive® e2. Learn how to create a bucket.
- Valid Access Key ID and Secret Access Key. Learn how to create an access key.
- An on-premises MinIO deployment with a source bucket and credentials that can read its objects. If you are setting up MinIO for the first time, see the MinIO installation guide.
- The MinIO Client (mc) installed on a computer that can reach both MinIO and IDrive® e2.
Configure the MinIO Instance
Configure the MinIO instance using the MinIO credentials:
# mc alias set minio "http://127.0.0.1:9000" "MINIO_ACCESS_KEY" "MINIO_SECRET_KEY"
Verify the MinIO connection:
# mc ls minio
The available MinIO buckets should be listed.
Configure IDrive® e2
Sign in to IDrive® e2 and copy the storage endpoint, Access Key ID, and Secret Access Key for the region containing the destination bucket.
Configure IDrive® e2 using the MinIO Client:
# mc alias set e2 "https://YOUR_E2_STORAGE_ENDPOINT" "E2_ACCESS_KEY" "E2_SECRET_KEY"
Verify the IDrive® e2 connection:
# mc ls e2
Copy MinIO Objects to IDrive® e2
Copy the objects from the MinIO source bucket to the IDrive® e2 destination bucket:
# mc mirror minio/<SOURCE_BUCKET> e2/<DESTINATION_BUCKET>
Example:
# mc mirror minio/qa-install-test-20260929 e2/e2-bucket
Verify the copied objects:
# mc ls --recursive e2/<DESTINATION_BUCKET>
Back Up New or Modified Objects
Run the mirror command with --overwrite to copy new or modified objects:
# mc mirror --overwrite minio/<SOURCE_BUCKET> e2/<DESTINATION_BUCKET>
Objects deleted from the MinIO source remain in IDrive® e2 when using this command.
To also remove destination objects that have been deleted from MinIO, use --remove:
Schedule Automatic Backup Using Cron
Open the crontab:
# crontab -e
Add the required backup schedule.
Example: Run every day at 2:00 AM:
0 2 * * * /usr/local/bin/mc mirror --overwrite minio/<SOURCE_BUCKET> e2/<DESTINATION_BUCKET> >> /root/minio-to-e2.log 2>&1
0 2 * * * means the command runs once every day at 2:00 AM.
Verify the cron configuration:
# crontab -l
Validate Scheduled Backup
Add a new object to the MinIO source bucket:
# echo "cron backup test" > /tmp/cron-pickup.txt
# mc cp /tmp/cron-pickup.txt minio/<SOURCE_BUCKET>/
Wait for the next scheduled cron run.
Verify that the object was copied to IDrive® e2:
# mc stat e2/<DESTINATION_BUCKET>/cron-pickup.txt
Review the backup log if required:
# tail -f /root/minio-to-e2.log
Continuous Synchronization
To continuously synchronize new and modified objects from MinIO to IDrive® e2, run:
# mc mirror --watch --overwrite minio/<SOURCE_BUCKET> e2/<DESTINATION_BUCKET>
The --watch option keeps the process running continuously in the foreground and synchronizes changes as they occur.
For long-running use, run the process using a service manager such as systemd or another persistent process method such as nohup.
By default, deleting an object from MinIO does not delete its copy from IDrive® e2. To synchronize deletions as well, add --remove.
# mc mirror --watch --overwrite --remove minio/<SOURCE_BUCKET> e2/<DESTINATION_BUCKET>
MinIO is a self-hosted, high-performance object storage platform that provides an Amazon S3-compatible API for storing unstructured data across on-premises, private cloud, hybrid, and edge environments. Integrating MinIO with IDrive® e2 provides a capable, scalable cloud object storage solution that effortlessly extends MinIO for secure, efficient offsite backup and data synchronization. Use MinIO Client (mc) to connect MinIO with IDrive® e2 and copy or synchronize objects between the storage environments.
Prerequisites:
Before copying objects from MinIO to IDrive® e2, ensure the following:
- An active IDrive® e2 account. Sign up here if you do not have one.
- A bucket in IDrive® e2. Learn how to create a bucket.
- Valid Access Key ID and Secret Access Key. Learn how to create an access key.
- An on-premises MinIO deployment with a source bucket and credentials that can read its objects. If you are setting up MinIO for the first time, see the MinIO installation guide.
- The MinIO Client (mc) installed on a computer that can reach both MinIO and IDrive® e2.
Copy MinIO Objects to IDrive® e2
The following steps can help you successfully copy MinIO objects to IDrive® e2.
- Sign in to IDrive® e2. On the Dashboard, copy the storage endpoint, access key and secret for the region where your destination bucket is located.
- Configure MinIO and IDrive® e2.
Note: These PowerShell commands assume $mc contains the path to mc.exe. The MinIO endpoint http://127.0.0.1:9000 applies when MinIO runs on the same computer. If MinIO runs elsewhere, replace it with your MinIO server’s endpoint.& $mc alias set minio "http://127.0.0.1:9000" "MINIO_ACCESS_KEY" "MINIO_SECRET_KEY"
& $mc alias set e2 "https://YOUR_E2_STORAGE_ENDPOINT" "E2_ACCESS_KEY" "E2_SECRET_KEY"
- Confirm that both buckets are accessible.
& $mc ls minio

                     & $mc ls e2
The commands should list the buckets available through each storage endpoint. - Copy the objects from MinIO to IDrive® e2
& $mc mirror "minio/source-bucket" "e2/destination-bucket"
- Replace source bucket with the name of your MinIO source bucket and the destination bucket with the name of your IDrive® e2 destination bucket.
- Verify the copied objects. After the copy completes, list the objects in the
IDrive® e2 destination bucket.
& $mc ls --recursive "e2/destination-bucket"
Verify that the expected objects and directory structure are present.
- Back up or sync later changes. For periodic backups, rerun the copy with
--overwrite to include changed objects. Objects deleted from MinIO remain in
IDrive® e2.
& $mc mirror --overwrite "minio/source-bucket" "e2/destination-bucket"